
Niki, Destiny, Kieth
I was asked about the lighting setup on a few portraits that I had shared in a FB post. The person asking was a design instructor I had in college. I thought it was neat and a little surprised that he asked, especially since he is a photographer as well. Responded that I would message him the layouts of the lighting setup.
I’ve been needing to put together a post, so I figured thats what I’ll do. So here are a couple lighting setups for some portraits that I do.
The first setup is for close up shots. I am a huge fan of Martin Schoeller, and I love his close up portrait work. I have watched a few different interviews with him as well have seen some behind the scenes videos of a few of his shoots. Seeing how he works, albeit remotely and without any real instruction, I have assimilated an approximation of his lighting setup and techniques. For the longest time the only light modifiers that I had were two 24” soft boxes. With that as a starting point I worked out a setup to begin to create images in that style. Just like any creative endeavor you copy to learn then grow your own through practice, then hopefully mastery of your craft.
Here is the layout I used for my close-up portraits.

It’s pretty simple and basic, but thats how I like to keep things. I’m a big fan of the “KISS” method, “keep it simple stupid.”
The second setup is even simpler. I am also a huge fan of Rembrandt, and of course Rembrandt lighting. That little triangle of light on the cheek along with a nice transition from light to dark as the light trails off around the subject’s head makes me happy. Yeah, I do geek out over lighting sometimes.
Here is a simple setup, for single light portraits and one way I get that lovely little triangle.
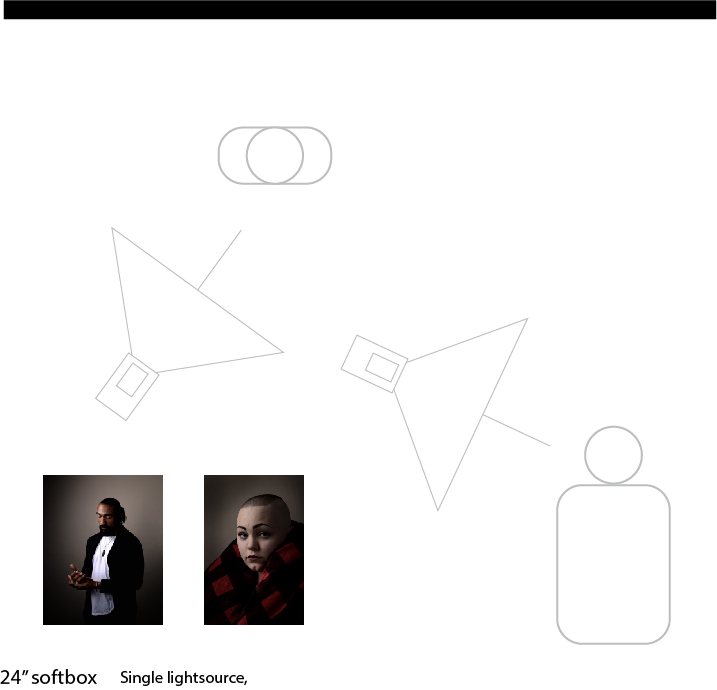
Basic, simple, thats how I roll, well kinda. Keeping things slightly askew and using the idea of 3/4 views and 45* angles is a great place to start. Just like the rule of thirds, try starting with your light at diagonal angles from your subject.
All of this of course is just a starting point, nothing is ever set in stone. Spend time playing with new ideas and techniques to build and improve your craft.
For more portraits, visit my People gallery.
Nexttime, “How did you edit these…”